| |
| Cutting & Fixing Your Composite Cladding |
|
| When you get your composite cladding, it is important to make sure each plank is the correct size for your project and to do this you need to cut down each plank using the correct methods. Once all of your cladding boards are the correct lengths and are ready to be fixed, you need to fit it correctly to your building using either a nailing method or a screwing method. |
| |
 |
|
Cutting |
Depending on how much cutting needs to be done, this will decide which cutting method is the most suitable. You can cut your composite cladding boards using a handsaw, guillotine, electric jigsaw or circular saw. After you have finished cutting, make sure to wipe away any dust with a clean, dry cloth.
You should always cut and drill your cladding in a dry and well ventilated environment. |
|
|
| |
| Recommended Cutting Methods |
 |
Guillotine
Cedral Weatherboard cladding can be cut with a specially manufactured guillotine. |
 |
Electric Jigsaw
Flipping your Cedral Weatherboard cladding over to cut on the reverse side will create a clean finish on the front of your board. |
 |
Hand Held Circular Saw
Using a hand held saw with fibre cement blades is an ideal way to cut large quantities of cladding boards. |
 |
Diamond Dusted Blade
With a tungsten tipped blade of 36 teeth on a 180mm diameter blade is the recommended cutting size. When using this method, it is advised to cut from the reverse side as the saw may leave marks across the surface. It is also advisable to do a test cut. |
|
| |
| Screwing |
| Screwing your cladding to the main support structure is the recommended fixing method for your cladding project. Find out the details about what to do when screwing your cladding below. |
|
|
 |
|
| |
|
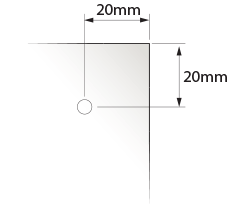
Where fixings are at least 50mm from the end of the cladding board, a screw fixing can be achieved without pre-drilling a hole. When the fixings are less than 50mm away from the edge, you need to make a pre-drilled hole and a countersink is required. The screws used should be stainless steel and a minimum size of 4.0 x 45mm.
These 20mm minimum distances from the edge should be taken into account when screw fixing your cladding. |
|
|
| |
 |
|
Nailing |
Much like screwing, you can nail your composite cladding to your building structure. Your Cedral Weatherboard cladding can either be nailed by hand or by pneumatic nailing, find out the differences below. |
|
|
| |
By Hand
When the nails are at least 50mm from the end of the board, the board can be hand nailed without pre-drilling, like with the screwing method. When the nails need to be closer than 50mm to the edge, the nail positions need pre-drilling with a 3mm drill bit. The nails you use should be stainless steel ring shank, with a minimum size of 2.8 x 45mm with a 7-10mm head. |
|
Pneumatic Nailing
Cedral Weatherboard planks can be pneumatically nailed with a nail gun. When fixing your cladding, you must use stainless steel nails as these will last as long as the board and you don't want them rusting. The nails used should also be 50mm long and have a diameter of 2.8mm. Before fixing the cladding to the structure, you should carry out a test nailing to set the depth of the fixing. The pneumatic gun you use should be adjustable otherwise the nails could be fired straight through the board or off from where you want it to be. You should also make sure that all nails are flush with the board face once nailing. |
|
| |